About Me

My photo
Corona, California, United States
I am 28 years old and married to my best friend, Nicholas. We have two beautiful boys together, Caleb and Noah. I am a full-time stay at home mom and these are my confessions...

Nick

Nick
{the Hubby}

Caleb

Caleb
{the Oldest}

Noah

Noah
{the Baby}

{FAMILY}

{FAMILY}

Posts You May Have Missed:

Thursday, March 28, 2013

{got talent?}


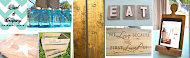
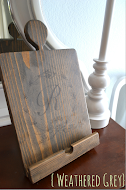
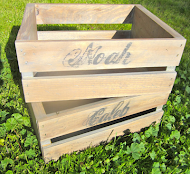
I apologize for my lack of posts lately, I have been consumed with getting things started and rolling for our etsy shop!!  My husband has told me for the past several months that I need to find a way to use my talents to bring glory to God and bring in some extra $$ for all my Hobby Lobby trips, ha! What women doesn't love her some HL?? In the last couple of months I have become increasisgnly intersted in woodworking, and making signs from salvaged wood. It started with making my iPad kitchen holder and from there I got the bug. My head is full of ideas, probably most of which are beyond my skills at this point, of wonderful things to make for my home. It may be just me, but I find the market for Christian home decor to be sorely lacking in style and color. 98% of what I find is in super dark colors with gold lettering. Bleh. Our home is on the lighter side with A LOT of white, greys and shades of turquoise blue. When I ran across some wood that was going to tossed out I thought I would give a try to putting together a wooden sign and painting them with inspiring quotes from Scripture and so forth. I did, and I'm hooked. I need a creative outlet so for me this has been a lot of fun. You can find my shop on etsy under the name: Lisset & Company


Monday, March 18, 2013

DIY Mason Jar Cup, Two Ways!


I love me some mason jars! So it seems fitting that I outfit myself with a mason jar turned cup for my iced coffee and sweet tea habit! I made two versions of the mason jar one using the standard metal pieces that came with the jar. And another version using a re-usable BPA free lid (Get 2 sample lids here for $2.50+free shipping) and rubber grommet for easier washing. I personally like the look of the metal version with the metal finishing washers as it has a old vintage look to it. I know that isn't for everyone, thus another version!
 Here is what you will need:
  • Glass jars
  • Drill with 5/16 drill bit 
  • #14 Stainless steel finishing washers
  • Super glue
  • Reusable straw
Find the center of your lid and drill a hold through the middle with your drill bit. It should go through fairly easy. Apply super glue to the bottom of your washer and place over the hole ensuring any jagged edges are covered. Do the same for the inside of the lids. You may want to dry fit this to make sure your washer will cover up the jagged edges, a couple time I had to widen my hole a little to the left or right to make sure it was clean through the washer opening. To do this I stuck the drill bit back through the hole and leaned it in the direction that needed widening. Easy! After your glue is dry you are ready for business. I am a avid sweet tea drinker so more times than not you will see my jar full of a iced cold glass! 

BPA-Free Lid Version
You can order BPA free reusable lids at Reusablecanninglids.com/. You can get a sample of two sizes with free shipping for $2.50! Awesome deal. It looks like their lids comes in bulk, but you could try calling the company to see if you could place a smaller order. They are also available on Amazon.com

Here is what you will need:
  • Glass jars
  • BPA Free Re-Usable lids
  • Drill but with 5/16 drill bit
  • 9/16 black rubber grommets
  • Reusable straw
Find the center of your lid and drill a hold through the middle with your drill bit. It should go through fairly easy. Insert your rubber grommet in the hole and pull out of the other side ensuring any jagged edges are covered.  Voila!

We will be adding mason jar cups with re-usable straws to the Etsy shop soon!
{QoK}

{Etsy Shop Opening}


We are proud to announce we have opened up shop @ Etsy!
"we create vintage, rustic pieces to add charm to your home decor"


Wednesday, March 13, 2013

Wooden Bunny Project


My hubby recently bought me a jigsaw! Hooray!! We had borrowed a friend's in the past to get little things done here or there but we decided we needed to take the plunge and start investing in good a tool collection. I have a lot of scrap wood in my garage, from who knows what project so I decided to make myself a little wooden bunny for my porch! First I went on google and found a bunny silhoutte I liked then I blew it up, printed it and cut it out. Then I traced it out on some scrap wood and cut it out with my jigsaw! Easy peasy! I also cut out a couple of wooden eggs for my porch as well. One egg has a very flat bottom, ha! He's special! After he was cut out I used some paints I had extra off, primarily Swan Sea by Behr which is the wall color in my boys room! I love that color, and I've been using it a lot around the house for little projects. 


Friday, March 8, 2013

Polyblend Grout Renew Review


Bleh, for yucky grout! Our kitchen counters are white tile with "white" grout. I say "white" because they are really just dirt color, haha. I have tried everything under the sun trying to get the grout clean and white again but only one item worked remotely. A couple months ago I did try a grout paint pen from Home Depot that worked pretty well. It would splatter and you had to keep shaking it and it covered a VERY small area for the $5.99 price tag. It did do the job pretty well, after all our grout is old so I can't expect it to return to it's glistening brand-new looking former glory.  But with that price tag I would be spending a good $36 in grout paint pens to finish the rest of the counters, no thank you! So I put that thought on the back burned until recently when my hubby told me that the rest of the counters looked pretty bad compared to the one I had used the grout pen on so he wanted to buy more and finish the job. My hubby is pretty laid back and doesn't really initiate any type of home improvement projects, so I was pretty surprised when he made this observation and wanted to finish it. I clean my kitchen on a daily basis but there is just no getting that darned grout clean! While at Home Depot I spotted a bottle that said GroutRenew! I was intrigued, and at $11.99 for a decent size bottle I knew it it worked I could do all my kitchen counters and have plenty left over.  GroutRenew is a all-in-one colorant and sealer. I choose bright white and couldn't wait to test it out at home. Read all instructions before beginning. I made sure to clean my counters and grout well with my handy dandy Krud Kutter and when it was dry it was time to roll out with the grout renew! I used a old toothbrush and just dipped it into the bottle, it was late and I was lazy! Make sure you are wearing a apron or clothes you don't mind it you mess up with paint, I was careful but I would lean over to get the corners and back areas and I would get paint on me. The bottle said not to let the paint dry on the tile. but because I have ceramic tiles I knew I could easily get it off later. I did keep a damp paper towel to wipe the excess paint off later on to make things easier on myself.  I used about 1/3 of the bottle to do all of my counters, so there is plenty left for touch-ups in the future. I am loving the end results! According to their website they have 48 colors available!Click here to read more about Polyblend GroutRenew.
Here are some pictures from my kitchen....


You can obviously see the HUGE difference in where I used the GroutRenew and didn't
Before Shot (Sorry, this was night time!)


After! Beautiful!
{QoK}

Tuesday, March 5, 2013

Upcycled Shirt to Glam Knotted Headband


So after just coming off of the DIY elastic hair ties I made, I have had hair accessories on the brain! What to make? What to make? With Spring and Summer fast approaching I want to start making some cute hair bands that I could wear. I also wanted to do this on a budget and preferably with materials I already had on hand.  I have many clothes that can be upcycled in to crafts so I grabbed a stack and set out to try and make some headbands. Here is a tutorial for one of them! I am calling it the Glam Knotted Headband! I wore it across my forehead for a more bohemian look, which I am really digging for this season. You can also wear this as a regular headband in your hair. This tutorial is pretty much all pictures, because words would just be too confusing to follow! Contrary to the photos you will need 4 strips of fabric, two for each starting formation of the left loop and right > shape. I just used two in the tutorial so it would be easier to see!

Here's What You Need:
  • Jersey fabric or an old shirt with stretch
  • Scissors
  • Glue gun
Start by cutting 4-2.5" strips all the was across your shirt
(cut through both sides so it will actually make a ring)


Cut one end of your shirt so you have a strip instead of a ring
Pull lightly on both ends of your strip so the ends curl up

Starting Configuration


Move you top left piece under the top right piece

Now move your bottom right piece under the loop on the left(see below for a better shot)


Grab top piece of > shape
Pull the top piece of your > shape under it's bottom piece you just laid under the loop

Continue to pull your piece over the loop


You should have this shape now!


Lightly begin pulling the ends tighter to bring the knotted shape inward


I cut a small scrap piece of fabric and glued the ends down on the longer sides
  to cover and glue the ends down to form the headband

You will need to cut the ends to a comfortable size for your head then put the glue down side  of your small scrap piece in the middle ensuring all the ends are tucked in

Flip it over and add some more hot glue and press the left side down

Add more glue and fold the right side down


DONE!